
SUMMARY: In this article, Jetico explains why temporary files can pose hidden privacy and security risks, from exposing sensitive data to harboring malware, and why Windows 11’s built-in cleanup tools are not enough. You’ll learn how BCWipe permanently removes temp files and data remanence, with clear step-by-step guidance for both HDD and SSD users. These practical tips help you improve cyber hygiene and prevent third parties from reconstructing your activity from the temp folder.
How to permanently delete temporary files on Windows 11? You may think that temporary files don’t remain on your system for very long, but sometimes they do. Although Windows 11 offers a way of removing temporary files, this method doesn’t delete data for good.
In this blog, we explain what temporary files are and why you need to remove them. We then provide step-by-step instructions on how to permanently delete temporary files from your hard drive.

Table of Content
- What temporary files are?
- Why you need to delete temporary files?
- How to permanently delete temporary files with step-by-step instructions
What Are Temporary Files?
Temporary files, also known as temp or tmp files, are generated to store information temporarily while data is being processed or used by a program. Temp files can also be created by the operating system when memory is needed for another task, or for backup purposes.

Why Temporary Files Need Secure Deletion?
Many programs don’t delete temporary files when they are no longer needed. Instead, this so-called ‘temporary’ data can accumulate and remain on your computer for a very long time. Temporary information obviously varies in content, but all temp files store traces of your activity and potentially sensitive data.
Here are the 3 main risks associated with temporary files:
Risk #1: Data Exposure to Hackers
Behind the scenes, the temp folder is like a treasure chest that Windows and various applications use to store bits of information. Unfortunately, third parties have the ability to easily reconstruct and analyze potentially sensitive data that can be found in your temporary files. You can think of temporary files as being cookies that are stored on your computer. Like cookies, temp files can be examined by third parties if they are not properly deleted.
Risk #2: Malware Hidden in Temp Folders
One of the most common places to find malware in your system is in the temp folder. If malware is embedded in a program or application then running it may create malicious temporary files. The best way to avoid any nastiness associated with the temp folder is to permanently delete its contents.
Risk #3: Disk Cleanup Leaves Residual Data
Windows 11 users will naturally gravitate to using the disk cleanup option that Microsoft provides to delete temp files. Unfortunately, this isn’t a secure solution as removing files this way leaves behind data remanence. By using widely available file recovery software, third parties are able to restore and access this type of residual data.
To maintain your data privacy, it’s strongly recommended to delete your temporary files with a trusted data wiping solution.
How to Permanently Delete Your Temporary Files
Now you know about the risks of letting your temp files stick around, it’s time to learn how to permanently remove them with BCWipe.
Step 1: Getting Started
You can begin by installing BCWipe. If you want help with installing the software, just check this how-to video.
Not quite ready to purchase BCWipe yet? No problem — get started with your free trial today.
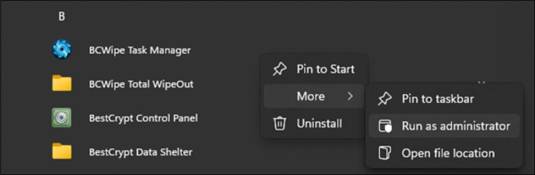
- Launch BCWipe by going to ‘Start’ –> ‘BCWipe’
- Right-click ‘BCWipe Control Panel’
- Select ‘More’ and choose ‘Run as administrator’
Step 2: Wipe Temporary Files with One Random Wiping Pass
Here’s how to begin the wiping operation with one random wiping pass scheme.
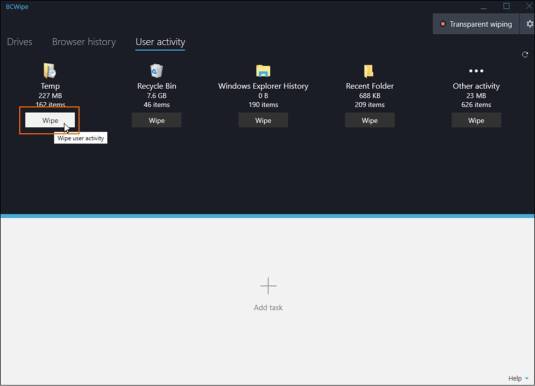
- Click on the ‘User activity’ tab
- Under the Temp folder icon, click on the ‘Wipe’ button
- By clicking on ‘Start’, you will begin the wiping operation immediately with one random wiping pass scheme
Step 3: Manually Select the Wiping Scheme (optional step)
If you would like to manually select the wiping scheme used for the operation, then please follow the instructions in this additional step.
- Click on the ‘Advanced’ task settings button
- Select the ‘Wiping options’ tab
- Under ‘Wiping scheme’, use the drop-down menu to choose the wiping scheme of your choice
- Click ‘Save and start’

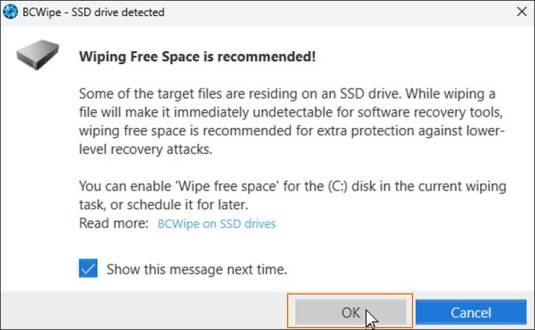
Step 4: Wiping Temp Files for SSD Users (optional step)
This is an optional step that only applies to users wiping data from solid-state drives (SSD).
- If you are using an SSD drive, you will see a message to run the ‘Wipe free space‘ task to prevent data recovery. Here are step-by-step instructions on how to wipe free space after deleting your temporary files.
- Click ‘OK’ to dismiss the message
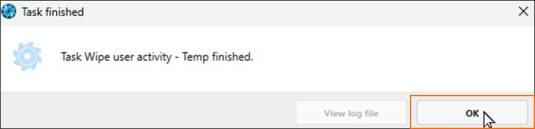
Step 5: Wipe Your Temporary Files
Now you can sit back and wait for your temporary files to be wiped.
- You will receive a notification once the task has finished
- Click ‘OK’ to dismiss the message
Nice Cyber Hygiene!
Now you know that wiping temporary files is the way to go, you can rest assured that third parties will not be able to reconstruct data from the temp folder.
Finally, practicing good cyber hygiene is something we’ve been advocating for over a decade. It’s a sensible idea to clean up your system every once in a while and flush out all traces of data remanence. This would naturally include clearing out your temp folder to remove the names of recently used files, traces of Internet activity and other unneeded data. So if you’ve followed our step-by-step instructions, you’re well on your way to having enviable cyber hygiene!
To find out more about data wiping, check out our ultimate guide to securely wiping computer hard drives clean.
Happy Wiping!
Frequently Asked Questions (FAQs)
Windows Disk Cleanup removes temp files at the file-system level but does not overwrite the underlying data. This leaves data remanence that can be recovered with widely available forensic tools. To make temp files truly unrecoverable, you need a wiping method that overwrites the deleted data.
Temp files often contain fragments of documents, cached web content, application data and sometimes credentials or session information. Many programs store working data in the temp folder, so attackers may reconstruct sensitive content if these files are not properly wiped.
Most users benefit from wiping temp files every few weeks or after handling sensitive documents. Individuals or organizations working with confidential information may choose to wipe temp files more frequently as part of their routine cyber hygiene.
Deleting marks files for removal but leaves the data itself on the drive until something overwrites it. Wiping replaces that data with an overwriting pattern to permanently erase all traces, preventing recovery even with forensic tools.
BCWipe permanently removes temporary files by overwriting them according to your selected wiping scheme. It can also wipe free space and includes SSD-aware processes to help ensure no recoverable traces remain anywhere on your system.