
SUMMARY: This guide explains what unprotected shadow copies are in Windows 10 and 11 and why they can pose storage and privacy risks. You’ll learn how shadow copies are created, why they can retain sensitive information even after deletion, and the pros and cons of different removal methods. The article also provides step-by-step instructions for deleting shadow copies using built-in tools such as Disk Cleanup and the Command Prompt, as well as using secure data wiping to permanently remove shadow copies and reduce the risk of recoverable data.
Easy Steps to Delete Shadow Copies
Unprotected shadow copies can undermine your data protection efforts as they contain potentially sensitive information. But what are shadow copies and why do they appear in the first place?
In the first part of this blog, you will find out what shadow copies are and why they pose risks to your security. You can then learn about the pros and cons of removing shadow copies with 3 different methods: Microsoft’s Disk Cleanup, the Command Prompt and independent data wiping software. Finally, you will find step-by-step instructions on how to remove shadow copies with each solution.

What Is Shadow Copy?
Shadow Copy, otherwise known as Volume Snapshot Service or VSS, is a feature in Windows that creates snapshots or backup copies of computer files and volumes.
Snapshots are created on local or external volumes by any Windows component that uses Shadow Copy technology, such as Windows Backup and System Restore. This can take place even when files or volumes are in use. Triggers for shadow copies being generated include the creation of System Restore Points and backups, as well as the installation of Windows updates, device drivers, system components and certain applications.
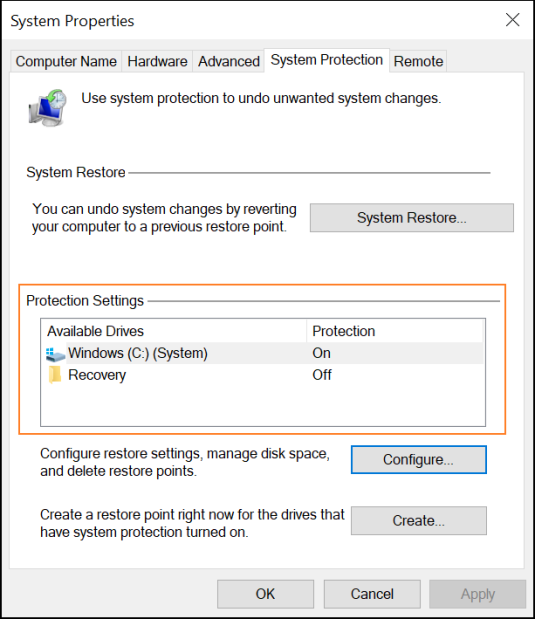
To see if your system has the creation of shadow copies enabled:
- In Windows Search, type “restore point” and click on ‘Create a restore point’
- In the new window, check the ‘Protection Settings’ area to see if restore points are activated
Shadow copies are typically found within the hidden System Volume Information folder in the root directory of a drive.
How Long Do Unprotected Shadow Copies Remain on Your System?
Windows deletes old shadow copies as soon as it runs out of shadow storage. In more technical terms, when the Maximum Shadow Copy Storage space is insufficient to store changes made to a particular volume, the VSS will automatically delete the oldest shadow copies first.
Really, there’s no sure way of knowing how long individual snapshots will remain on your system. But if you customize your Shadow Copy setup to favor longer retention periods, then it’s possible that snapshots may hang around for over a year. On the other hand, you may find yourself running out of space for even a single shadow copy at any given time if there’s a lot of disk activity.
Why Should You Delete Shadow Copies?
Firstly, it should be said that shadow copies have a lot of good functions. For example, you can restore previous versions of documents, files or folders that have been accidentally deleted. If your system malfunctions, you can also use System Restore to revert back to a previously working state.
However, when you delete a file, you should make sure that you remove any existing shadow copies of the file as well. Here are 2 reasons why deleting shadow copies is advised:
Storage & Performance Impact
Having a large amount of shadow copies on your system can eat up your storage space and negatively impact system performance and stability. This is particularly true if your shadow copy storage is set to unbounded.
Security & Data Exposure Risks
More importantly, there are security implications to keeping shadow copies on your system. Even if you have used data wiping software to remove a specific file, attackers may be able to retrieve it if the shadow copy remains on your system. This could lead to potentially sensitive information being inadvertently shared.
Is It Safe to Remove Shadow Copies?
Yes, it’s safe to delete shadow copies if your system is working correctly and you don’t need to keep any particular snapshots that have been created. Instead, you can consider creating system image, file and disk backups when needed.
How Should I Delete Unprotected Shadow Copies?
Now we’ll take a look at 3 different solutions you can use for deleting shadow copies: Microsoft’s Disk Cleanup, the Microsoft Command Prompt and data wiping software.
Disk Cleanup
Disk Cleanup is a Windows maintenance utility that is designed to free up space on a computer’s hard drive. Skip to step-by-step instructions.
👍 Pros:
– Disk Cleanup is included in Windows 10 and 11, so it’s free
– Simple and quick to use
👎Cons:
– Does not permanently delete data
– Using Disk Cleanup leaves behind data remanence, which gives attackers the opportunity to restore and access your information
Command Promp (VSSAdmin)
From the Command Prompt (cmd.exe), you can access VSSAdmin to manage the shadow copies on your system. From here, you can choose to delete all existing shadow copies or selected shadow copies from a volume. Skip to step-by-step instructions.
👍 Pros:
– The VSSAdmin command line utility is a free service for Windows users
– Can also be used to modify the size of your shadow copy storage space
👎 Cons:
– Removing shadow copies with the Command Prompt doesn’t permanently delete data
– Leaves behind data remanence
Data Wiping Software
Trusted data wiping solutions are able to securely erase files beyond forensic recovery. Skip to step-by-step instructions.
👍 Pros:
– Permanently deletes shadow copies, including data remanence
– Ensures your potentially sensitive information remains private
👎 Cons:
– Independent software that is not included with your operating system
– Paid solution, but free trials may be available
How to Delete Shadow Copies with Disk Cleanup
Please follow these step-by-step instructions to remove your shadow copies with Microsoft’s Disk Cleanup.
- Type “Disk Cleanup” in the Windows Search on your taskbar and open the app
- Select the partition or drive you want to remove shadow copies from and click ‘OK’
- Press the ‘Clean up system files’ button, select the partition or drive again, then click ‘OK’
- Select the ‘More Options’ tab, then click on the ‘Clean up…’ button in the ‘System Restore and Shadow Copies’ section
- Press ‘Delete’ to delete all but the most recent shadow copies
How to Delete Shadow Copies with Command Prompt
To help you use the Command Prompt to delete shadow copies, here’s some information on the command line syntax:
- /for=: Specify which volume’s shadow copies you want to delete
- /oldest: Delete the oldest shadow copy only
- /all: Deletes all shadow copies on a specified volume
- /shadow=: Deletes the shadow copy specified by ShadowID. To get the shadow copy ID, use the vssadmin list shadows command
- /quiet: Specifies that the command won’t display messages while running
Follow these steps and examples to delete shadow copies using VSSAdmin in Command Prompt.
- Type “Command Prompt” in the Windows Search and select ‘Run as administrator’ in the right-side panel
- From the following examples, type the command that best suits your needs and then press ‘Enter’:
– Delete all shadow copies from volume C: > vssadmin delete shadows /for=c: /all
– Delete the oldest shadow copy from volume C: > vssadmin delete shadows /for=c: /oldest
– Delete a specific shadow copy from any volume: vssadmin delete shadows /shadow=[Shadow ID] - Type “exit” and press ‘Enter’ to quit the Command Prompt
How to Delete Shadow Copies with Data Wiping Software
We are using Jetico’s BCWipe as an example in the following step-by-step instructions, a long-trusted solution that’s been used by the U.S. Department of Defense for more than 15 years.
You can begin by installing BCWipe. If you want help with installing the software, just check this how-to video. Not quite ready to purchase BCWipe yet? No problem — get started with your free trial today.
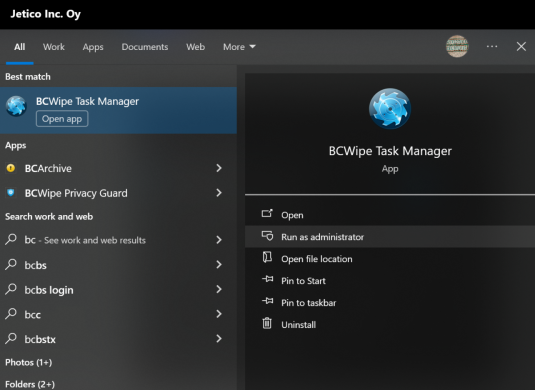
- Launch BCWipe by going to ‘Start’ –> ‘BCWipe’
- Choose ‘Run as administrator’
- Select the gear icon to access ‘Settings’ menu, then select ‘Common preferences’
- Check the box that says ‘Also wipe System Restore points that contain backup copies of targeted files’
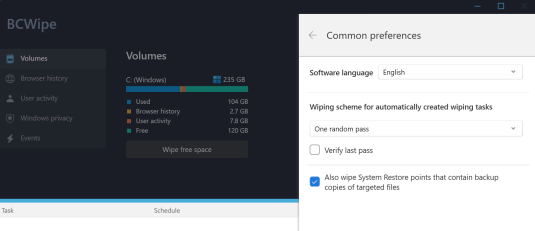
Now all tasks created in BCWipe will automatically include the option to remove shadow copies.
When using the right-click command to wipe a selected file, you will receive the following message if shadow copies of the same file exist in your system:
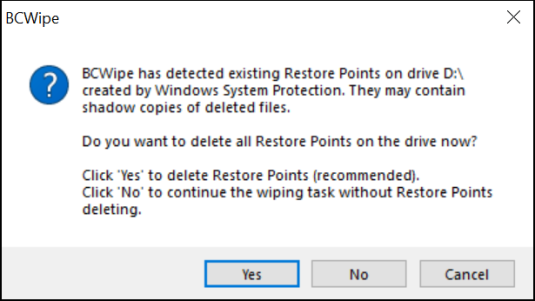
In this situation, you can wipe shadow copies by clicking ‘Yes’ and continuing with the operation.
Further Reading
Congratulations, you have now removed unnecessary shadow copies from your system!
If you want to learn more about wiping drives and files, why not check our ultimate guide?
Happy Wiping!
Frequently Asked Questions (FAQs)
Shadow copies are snapshots created by Windows’ Volume Shadow Copy Service (VSS) to support features such as System Restore, backups and previous file versions. They are often generated automatically during system updates, software installations or backup operations. While useful for recovery, these snapshots can also contain outdated or sensitive data.
Shadow copies can retain earlier versions of files that were deleted or even securely wiped from active storage. If they are left unprotected, unauthorized users or attackers may recover sensitive information from these snapshots. This makes shadow copies a hidden but often overlooked source of data exposure.
Yes, it is generally safe to delete shadow copies if the system is stable and you do not rely on restore points or previous file versions. Before removing them, it is important to confirm that alternative backups are available. Deleting unnecessary shadow copies can also free disk space and reduce attack surface.
Deleting shadow copies using built-in Windows tools removes references to the snapshots but may leave underlying data remnants behind. Secure wiping goes further by overwriting the data itself so it can’t be recovered later. In environments that handle sensitive or regulated data, wiping provides a higher level of assurance.
Native Windows utilities can delete shadow copies but they do not address data remanence. Dedicated wiping tools from vendors such as Jetico are designed to securely erase shadow copies and associated residual data beyond forensic recovery. This approach supports stronger data protection and compliance requirements.