
SUMMARY: Deleting files from an SSD doesn’t always make them disappear. Because of wear-levelling and controller logic, standard delete commands may leave data recoverable. Here are three steps to ensure secure removal: wipe the selected files, wipe the free space and manage reserved space. With BCWipe you can erase sensitive data forever, even on SSDs.
How to delete files on SSD? You hit the delete button and the file is gone, right?
Unfortunately, with most storage methods, that isn’t the case. And while SSDs are supposed to delete your files immediately using a command called ‘TRIM‘, it’s often unreliable.
The good news is this means you have a chance of recovering the file you just accidentally deleted, just with considerably more difficulty than with a traditional hard drive. The bad news, however, others can recover your deleted files too. With some data this might not matter, but with sensitive files you may want to make sure it’s really gone. Many organizations are often legally required to delete personal data, such as the ‘Right to Be Forgotten‘ in GDPR or the ‘Right to Erasure‘ in LGPD. And what if you’re using a removable drive to transfer files to a third party? Or taking your laptop overseas?

Media sanitization refers to a process that renders access to target data on the media infeasible for a given level of effort.
National Institute of Standards and Technology (NIST) SP 800-88 Rev. 1, Guidelines for Media Sanitization, p. 1.
In this blog we’ll explain the issues with wiping selected files on SSD, as well as provide you with 3 easy steps to overcome this challenge.
*Skip to step-by-step instructions*
What Is the Biggest Challenge for Wiping Selected Files on SSD?
The biggest issue is that SSDs don’t store files the way HDDs do. Hard disk drives know exactly where each file is located. The file occupies a number of sectors on the drive; and a wiping tool can locate those sectors and overwrite them.
It’s not so simple with SSD – memory cells have a limited capacity of read/write operations. Wear-levelling manages this limitation by distributing writes evenly across the drive. The SSD controller can then decide where to put the updated contents. Unfortunately, this means you can’t know for sure where your new data goes, making it impossible to locate and overwrite a specific file.
One approach is to just erase the entire drive. Disk erasure tools get rid of all pieces of data by overwriting every sector. Unfortunately, this cleans everything off the disk, including user files and operating system data. In some cases, this might be practical, like with a removable drive where you frequently replace all the data. Yet on modern computers with SSD or hybrid drives, regularly erasing everything is clearly more of a problem. Nobody wants to be restoring from backups after every time a file or folder is deleted. So most people think just to rely on TRIM to ensure their files are gone. Unfortunately, while TRIM is a better deletion command than on most HDDs, it still only ‘forgets’ about the file rather than securely erasing it. The file contents are erased only when the SSD eventually writes to that cell.
But there’s hope! Instead regularly erasing the entire drive just to get rid of a single file, wipe free space is a functional alternative. Wiping free space securely overwrites all available cells of the SSD, which includes files marked for deletion. Your active files are left alone.
Sounds like magic? Let’s show you how it’s done with BCWipe.
How to Delete Files on SSD in 3 Easy Steps
There are 3 simple steps for deleting files on SSD forever:
- ‘Delete with wiping‘ on selected files or folders
- ‘Wipe Free Space‘ using 3-pass DoE scheme to ensure secure deletion
- Optionally, use ‘Reserved Space Manager‘ to work faster
First, if you haven’t installed BCWipe, please do so. You can watch our how-to video to help. If you aren’t ready to commit, the software is available for free trial.
Once you have successfully installed BCWipe, then ‘Run as administrator’…
- Go to Start menu
- Select ‘BCWipe’
- Right-click ‘BCWipe Task Manager‘
- Select ‘More’ and choose ‘Run as administrator’
- If prompted for elevation, click ‘Yes’

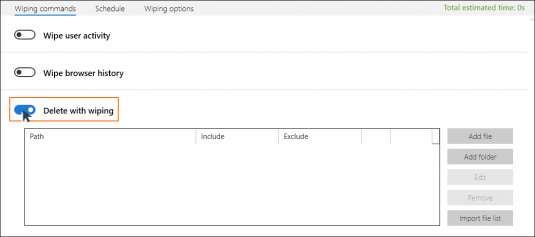
Step 1: ‘Delete with wiping’
- Click the ‘Add Task’ icon

- Enable ‘Delete with wiping’ under the Wiping commands tab
Then follow these steps to delete the file:
- Under ‘Delete with wiping’ click ‘Add file’
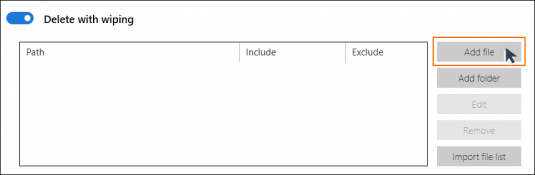
- Browse and select the data
- Click ‘Open’
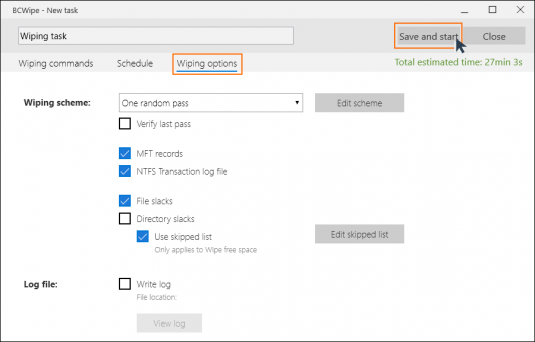
- Click ‘Save and start’ to start the process
NOTE: BCWipe will erase these files beyond recovery. Always double check you have picked the right files!
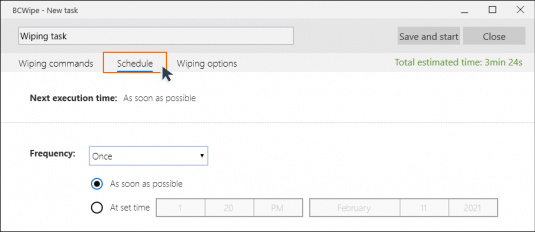
Before clicking ‘Save and Start’, check the other tabs. You can use ‘Schedule’ to set a specific start time for the task, or task frequency. ‘Wipe options’ switches between wiping schemes and allows enabling a logging function to record what was deleted.
Step 2: ‘Wipe Free Space’
Next, to complete the wiping process to make sure that the file is really gone.
- Enable ‘Wipe Free space’ option
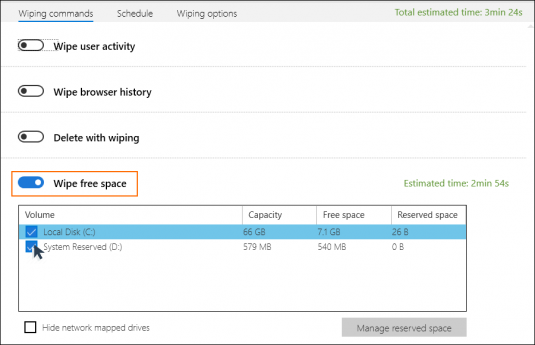
- Select the drive subject files resided on.
- (Optional) Select the ‘Schedule’ tab to confirm when the task will run
- Select the ‘Wipe options’ tab and choose from the dropdown menu ‘U.S. DoD 5220.22-M(E)‘ to ensure secure deletion
- Click ‘Save and Start’ to start the task now or ‘Save’ if you have selected to schedule it for later.
This will run the Wipe Free Space command to ensure secure deletion. Wiping free space overwrites everything on the drive that does not contain an active file, including cells that were completely empty.
Step 3: ‘Reserved Space Manager’ (Recommended)
Wiping free space takes a while to run and should be scheduled to occur during downtime. If you use this command regularly, then we recommend using Reserved Space Manager. This feature blocks a portion of cleaned free space, removing the need to wipe this part every time. From now on the amount of space to overwrite is smaller, completing the ‘Wipe Free space’ task in less time.
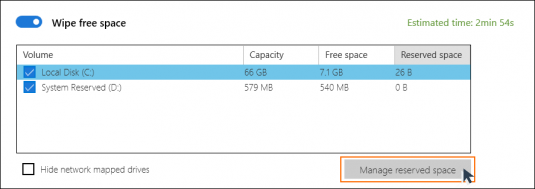
- Go back to ‘Wipe Free space’
- Select a drive from the ‘Local drive list’
- Click ‘Manage reserved space’
- Set the “Enable reserved space” checkbox.
- The slider will jump to the recommended value. Drag to adjust if needed.
- Click ‘Set’
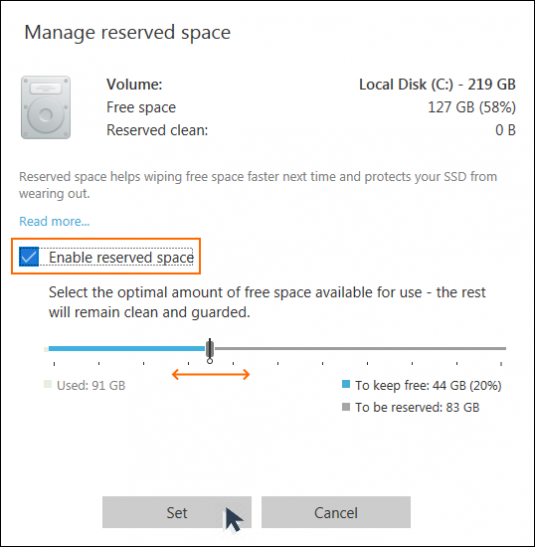
If your drive starts to fill up, the software will automatically reduce the size of reserved space, making more free space available to be used for files. You can also manually adjust the amount of reserved space at any time. For example, after deleting a large amount of data you could increase the size of reserved space to run Wipe Free Space even faster.
Happy Wiping!
Frequently Asked Questions (FAQs)
When you delete a file your system removes only its reference, not the data itself. Even with TRIM, an SSD simply marks the space as available. Until that area is overwritten deleted information can still be recovered with forensic tools.
SSDs use wear levelling to spread data across different memory cells, making it impossible to know the exact physical location of a file. As a result wiping tools cannot overwrite a specific file directly. BCWipe solves this by wiping all unallocated space so any deleted data becomes unrecoverable.
Delete with wiping securely erases selected files immediately. Wipe Free Space targets previously deleted data stored in unallocated areas. Running both ensures that new deletions and older remanences are fully removed.
Reserved Space Manager keeps part of the free space permanently wiped. Future Wipe Free Space operations only need to process new or changed areas, which speeds up the task and maintains strong protection.
Yes. TRIM improves performance but does not meet data protection requirements like the GDPR Right to Be Forgotten. For irreversible deletion and compliance you need a trusted wiping tool such as BCWipe, which overwrites data beyond forensic recovery.
Related Articles
Right to Be Forgotten – 3 Steps to Not Forget
File Shredder for Data You Must Destroy
Data Spill – An Everyday Threat to National Security
The Ultimate Guide to Securely Wiping Computer
How to Securely Wipe Your Windows 10 Computer Clean
How to Securely & Completely Wipe Your MacBook Clean
Degaussing Doesn’t Work on SSD – Use Data Wiping Instead