Booting target device with BCWipe Total Wipeout
Once you've finished all steps in BCWipe Total WipeOut Configuration Wizard you have a bootable USB / CD or an EXE file on your hands.
The next step is to start BCWipe Total WipeOut Wiping Utility off that USB / CD / EXE on the device, the drives in need to be erased are connected to. Below we will review the steps to do so for USB and CD and for EXE.
Step 1. Plug the USB / insert the CD in the target device
With a CD, you can use a USB CD reader as well.
Step 2. Configure the target device to boot from CD/USB.
Option 1. Use one-time boot menu.
- Open one-time boot menu. Most often, it's accessible by pressing F8, F12 or Esc at early system start. The keys might vary depending on the vendor. If you're not sure how to open the one-time menu, check the device manual.
- select the USB / CD from the list of available boot options
🗲HINT: If the USB is listed two times, e.g. Kingston 4GB and UEFI: Kingston 4 GB, select the option marked with UEFI
Option 2. Set CD / USB as a first boot option.
- Enter device BIOS.
🗲HINT: Most often, BIOS is accessible by pressing F1, F2, F12 or DEL at early system start. The keys might vary depending on the vendor. If you're not sure how to access BIOS, check the device manual or this guide: How to Enter the BIOS on Any PC: Access Keys by Manufacturer
- Navigate to Boot --> Boot sequence / Boot priority
- Change Boot Option #1: select the USB / CD from the list of available boot options
Step 3. Start BCWipe Total WipeOut Wiping Utility
In case you chose to follow Option 1 and step 2, the device will start booting off the USB / CD automatically.
For Option 2, you will need to save changes to BIOS setup (F10). The device will boot of the USB / CD after a restart.
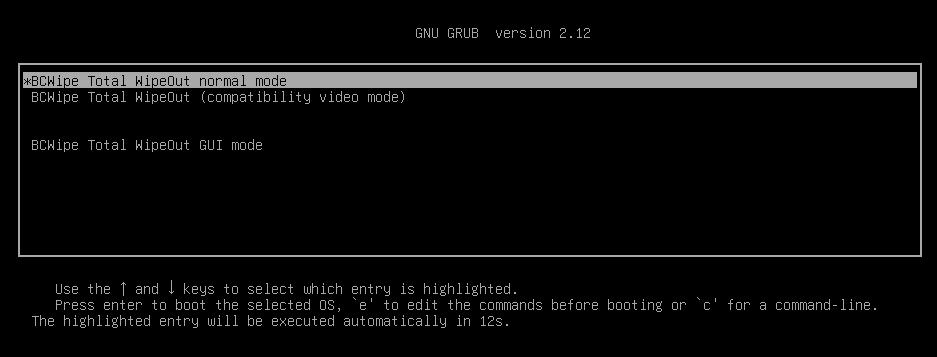
At the beginning of the boot process, the user can choose normal (text) or graphic (GUI) mode of the user inreface. As well, it is possible to choose compatibility video mode in case if there is a problem with a video driver (black screen).
The boot process continues and shows some service records:
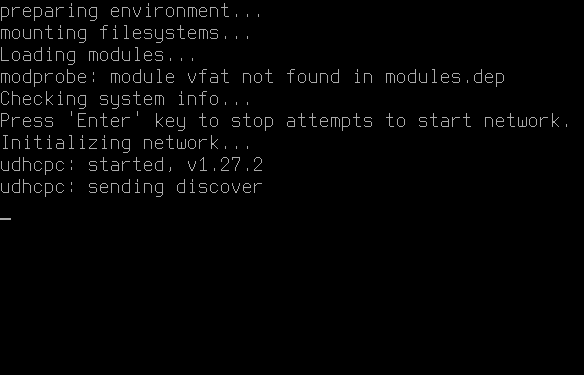
Wait for loading modules. Once, finished, you will see the BCWipe Total WipeOut Wiping Utility UI.
Step 1. Copy the output EXE file to the Windows computer you're looking to wipe.
When created, the win_wiper.exe file is saved to the Documents folder by default. Alternatively, the Overview step of the Configuration Wizard will display the path to the executable.
Step 2. Run 'as Administrator'.
Option 1. Run the EXE file manually.
- On the Windows computer you're looking to wipe, right-click on the EXE file and select 'Run as Administrator'
- Click "Yes" to allow changes.
🗲HINT: The Publisher: Unknown message is expected. Since the EXE file is custom-built for your needs in real time, it can not be digitally signed by us.
Option 2. Run the EXE file via Command Prompt.
- Launch Command Prompt 'as Administrator'
- Navigate to the folder you have copied the EXE file to
- Launch the EXE file. Use the parameters below to customize the behavior:
|
-R |
Automatically reboot the endpoint and launch BCWipe Total WipeOut wiping utility once the configuration is complete. |
|
-S |
Silent mode, no on-screen dialog will be displayed, any messages will be written to the log file. |
|
-L<log_file_path> |
Change where log file is stored. By default, the log is written to result_log.txt in the same folder win_wiper is run from. |
|
-P<partition_size_bytes> |
Define the size of the service partition BCWipe Total WipeOut will create and boot from. The default value is 1073741824 bytes (= 1 GB). |
|
-F<source_file_path> |
Define the folder to copy the loader from. By default, it is copied from the 'loader' subfolder. |
|
-U |
Undo the creation of the BCWipe Total WipeOut service partition. The partition will be deleted, the size of any shrinked partition will be restored. |
|
-? |
Display inline help. |
Examples:
win_wiper.exe -R -S
win_wiper.exe -U
win_wiper.exe -P1073733632 -L\"C:\\log file.txt\"
Step 3. Confirm and reboot
Unless you've enabled the silent mode via Command Prompt, you will see the following confirmation message:
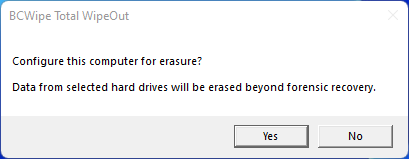
Click Yes to confirm erasure. Wait for the configuration to complete
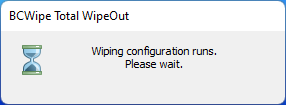
Once the configuration is complete, you will see the following message:
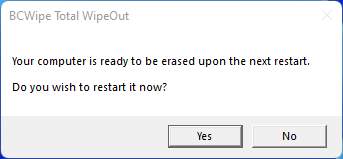
Click Yes to restart the device and launch the erasure immediately. Or click No to restart manually later.
Following the restart, BCWipe Total WipeOut Wiping Utility is launched. Depending on the Workmode selected, wiping will either start automatically after a 1-minute countdown (Automatic mode) or the tool will await for the user command (Manual mode).
Next topics:
BCWipe Total WipeOut wiping utility
Running BCWipe Total WipeOut automatically