This article explains steps of deployment and uninstallation of Jetico client software on remote computers and how an administrator controls the processes with Jetico Central Manager Console.
The following picture illustrates states of the deployment and uninstallation processes.
Deployment process starts from State 1: Software is not deployed.
To run the deployment process Administrator should do the following:
Check boxes for software that has to be deployed appear in a checked state with a red colored plus mark. The red mark means that Administrator has assigned the software for deployment but has not yet applied the settings. Jetico Central Manager has not saved the settings to database yet, so if Administrator quits the program or clicks , Jetico Central Manager will forget the settings. Such a state of deployment process is State 2: Software is assigned for deployment.
If Administrator clicks in the Deployment tab, Jetico Central Manager saves all the settings made on Step 2 to database.
If Push deployment method is assigned, the deployment proceeds in the following way:
If Outside/Manual deployment method is assigned, the deployment will be started after running the jci@xxx.exe program on the client machine. Until then, the deployment process will remain in State 3: Software is queued for deployment.
As soon as Jetico Central Manager deploys client software on remote computer, the database sets State 4: Software is deployed for the computer.
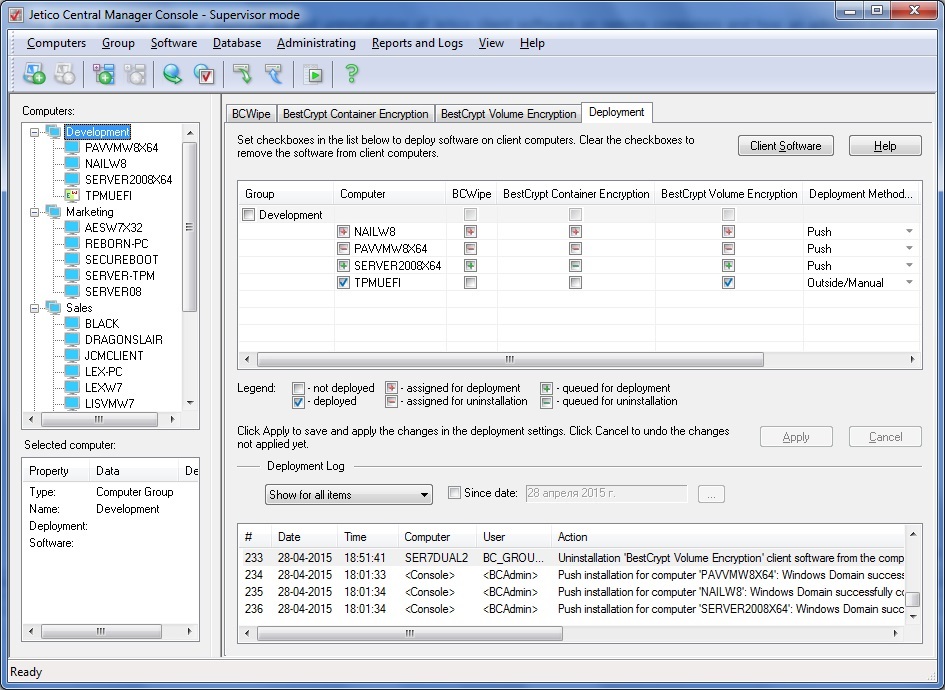
The following picture illustrates Deployment tab in Jetico Central Manager Console where different computers are in different states of the deployment process.
To uninstall the client software Administrator should do the following:
There is another way to uninstall the client software: delete the computer from JCM database. In that case, if the deleted client computer is turned on or rebooted, the client software will be uninstalled and also Installation Agent will be removed.
Note that on every step of deployment or uninstallation software from remote computers some problem may arise. The table with list of computers in the Deployment tab has the Error code column with number of error occurred (or with No error status if everything is going on correctly). Read article Deployment Error Codes to get detailed explanations and possible solution for the problem.
Administrator can configure a whole group of computers for deployment of the client software. In this case Administrator should just click checkbox with name of the group. Since that time the state Administrator sets for the group will be automatically applied for all the computers from the group.