Wiping commands
BCWipe offers four wiping commands that can be performed within a single wiping task. Tick the checkbox next to the appropriate wiping command to include it in the wiping task.
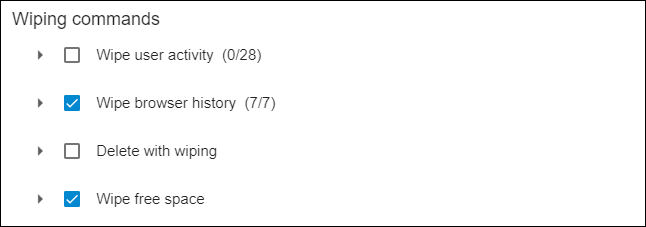
Clicking the drop-down menu icon next to the wiping command will expand the view, offering a more detailed selection.
Use this wiping command to erase traces of your activity on the PC.
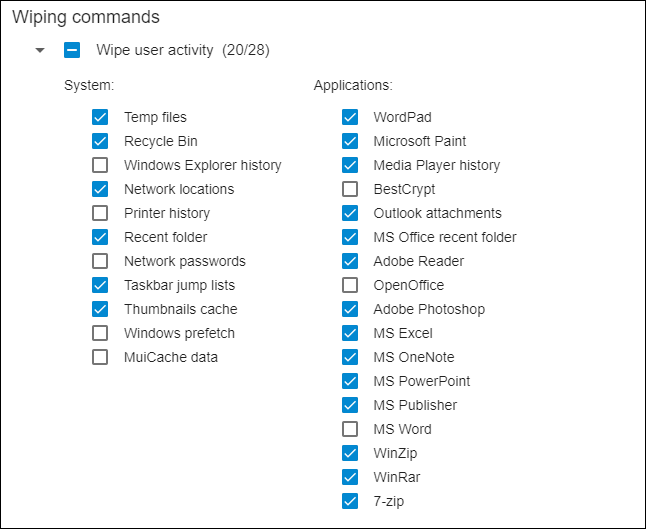
BCWipe automatically lists ‘System’ and ‘Applications’ locations that store traces of user activity on their PCs, including the Windows ‘Temp’ folder, ‘Recycle Bin’, ‘Print history’, ‘Search history’, and more.
To wipe an item from the list, tick the corresponding box. Selected items are highlighted in white.
The checkbox next to the wiping command can be used to select or deselect all boxes.
The most commonly used apps, like Microsoft Office components and Adobe products, are included on the list of applications. You can use BCWipe to clean the user activity associated with these apps.
Want to suggest an application to be included in the list? Let us know here: Contact Jetico Support
Use this wiping command to erase traces of online activity from your PC.

To clean all browser-related data, tick the checkbox next to ‘Wipe browser history’. To only erase types of data, like browsing history or cookies, click on the corresponding boxes.
BCWipe automatically detects browsers installed on the target PC. As part of the centralized wiping policy, BCWipe will erase selected data associated with every browser on that PC. In contrast, when using BCWipe locally, you can selectively erase data associated with a given browser.
Learn more about BCWipe on client PCs here: BCWipe on Client Computers
Use this wiping command to erase selected files and folders beyond forensic recovery.
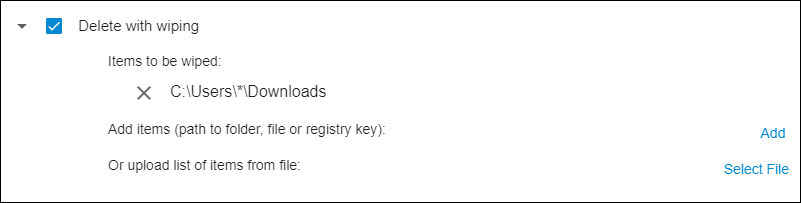
Type in a path to a folder or file you want to be erased, or copy a registry key name.
When targeting a folder, you can also adjust the ‘Include only’ and ‘Exclude’ lists to selectively erase its contents. To do so, tick the checkbox next to the appropriate list and specify the file names or patterns to be included or excluded.
🗲HINT: Use wildcards [*] to specify a pattern. For example, ‘*.txt’ signifies all files with the ‘txt’ extension, and ‘finance*.xls’ stands for all Excel files that start with the word ‘finance’.
When you’re finished customizing the path, click the ‘+’ icon to add it to the wiping task.
To add files and folders to be erased in bulk, prepare a txt file with the list of paths and ensure that each path starts from a new line. You can then load files from the list by clicking ‘Browse’ and selecting the txt list file.
To remove files or folders from the selection, click the cross icon on the left of their path.
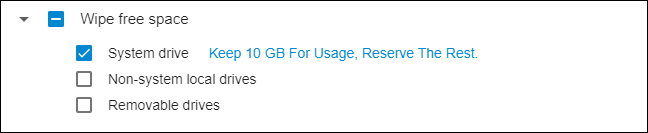
Use this wiping command to erase traces of previously deleted files from target computers.
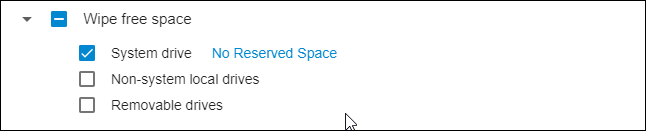
Tick the checkboxes next to the drives that you want to wipe free space on.
As part of a centralized policy, BCWipe can target:
🗹 System drives — The drive that hosts the OS files.
🗹 Non-system local drives — Other local drives hosting non-OS data.
🗹 Removable drives — Any removable media, including SD cards, external drives, and USB sticks.
🗲HINT: BCWipe’s Reserved Space feature helps to save time and resources by preserving part of the free space after wiping.
Reserved Space
BCWipe Enterprise Edition allows for central management of reserved space.
The Reserved Space feature helps you to wipe free space faster in the future and protects your SSD from wearing out.
Learn how Reserved Space can help address data spills in a more timely and efficient manner: WHITEPAPER — Data Spill Cleanup & Optimizing Resources | Jetico
To enable the Reserved Space feature, click ‘No reserved space’ next to the drive type. The following dialog will then open:
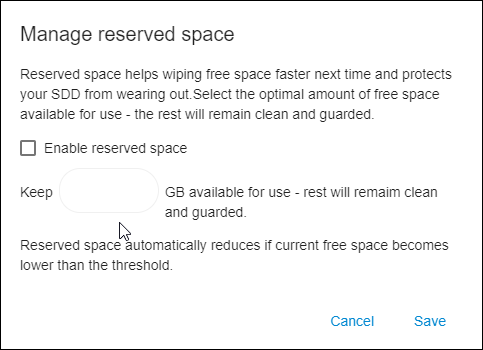
Tick the ‘Use reserved space’ checkbox and enter the optimal amount of free space available for use (for example, 10 Gb). The rest will remain clean and guarded. Then click ‘Save’.
To learn more about the Reserved Space feature and how to configure it, visit this page: Reserved space