Schedule
With BCWipe Enterprise Edition, you can schedule a wiping task to automatically run at a fixed time or set up a recurring wiping task.
To set up a recurring wiping task, click on ‘Schedule’ when creating a wiping task. ‘Schedule’ can be found next to ‘Wiping commands’.
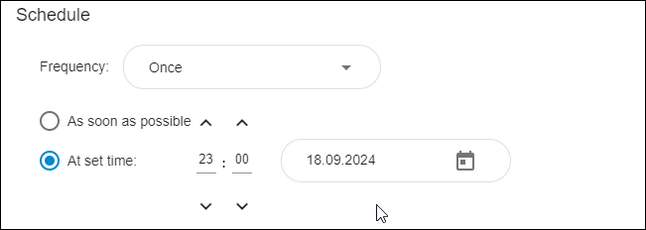
The default schedule is ‘Once’ and ‘At defined time and date’. If you don’t change the schedule, the task will be automatically executed at 23:00 on the same day. You can adjust the schedule by choosing another date and time.
Another option for a one-time task is ‘Once’ and ‘As soon as possible’. If you select this option, the task will automatically start once the policy is assigned to a PC that’s switched on. Otherwise, the task will automatically start the following time the PC is switched on.
You can run wiping tasks with ‘Frequency: Once’ again manually by clicking ![]() on the task view on the Computer Page.
on the task view on the Computer Page.
🗲HINT: If a one-time wiping task was interrupted by the client computer's shutdown, the task will get the 'Terminated' status and will be automatically restarted when the computer is switched on.
🗲HINT: If you have set up a one-time wiping task and your PC is not switched on at the assigned time, the task will get the 'Queued' status and will proceed when the computer is switched on.
To create recurring wiping tasks that start automatically, choose a different frequency. To do so, click on the drop-down menu next to ‘Frequency’. This will offer you the following selection:
🗲HINT: If you have set up a recurring wiping task and your PC is not switched on at the assigned time, the task will get the 'Skipped' status and will proceed during the next scheduled time.
‘Daily’ — Choose this option for the task to automatically run every ‘X’ days.
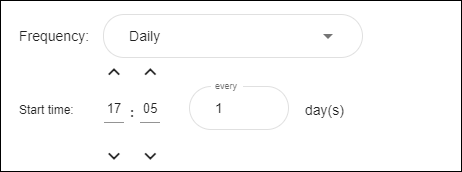
In addition, you can set a time for the task to start and chose a recurrence interval (in days).
‘Weekly’ — Choose this option for the task to automatically run on a set weekday every ‘X’ weeks.
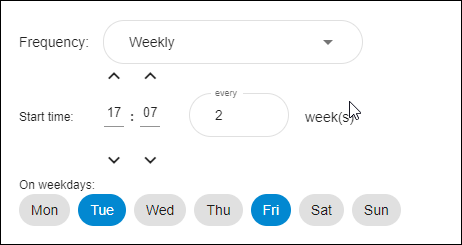
In addition, you can set a time for the task to start, choose a recurrence interval (in weeks), and define one or multiple weekdays for the task to be executed.
In the above example, the task will automatically start every second week on Tuesdays and Fridays at 16:45.
‘Monthly’ — Choose this option for the task to automatically run on a set date or on a defined weekday every month.
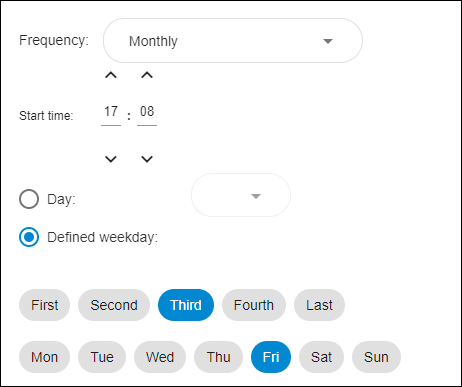
Select ‘Date’ and pick a date from the drop-down menu for the task to automatically run on a set date every month.
Select ‘Weekday’, define one or multiple weekdays, and choose an order number for the task to automatically run on a set weekday every month.
In the above example, the task will automatically start on the third Friday of every month at 16:45.
‘At user logon’ — Choose this option for the task to automatically run when you log in to your Windows account.

You can also choose whether the task should automatically run every time you log in, or once a day/week/month only.
‘At user logoff/shutdown’ — Choose this option for the task to automatically run when you sign out of your Windows account or shut the PC down.

In addition, you can choose whether the task should automatically run every time you sign out or shut the PC down, or once a day/week/month only.
🗲HINT: You can forcibly sign out when a logoff/shutdown task is running by clicking ‘Logoff’ on BCWipe’s progress dialog box. For a regular sign out, the task will continue as normal when you are logged off. If the PC is being shut down, the task will be terminated.
By default, the timeout for logoff scripts in Windows is 10 minutes. This means that if the wiping task has taken more than 10 minutes to complete, the system will force you to sign out. For a regular sign out, the task will continue as normal when you are logged off. If the PC is being shut down, the task will be terminated.
To increase the timeout period, perform these steps (administrator privileges required):
• Open ‘Group Policy’: Select ‘Start’ → ‘Run’ → then type 'gpedit.msc'.
• In the left pane, navigate to ‘Computer Configuration’ → ‘Administrative Templates’ → ‘System’ → ‘Scripts’
• Select ‘Maximum wait time for Group Policy scripts’, then right-click and run the ‘Properties’ command.
• Click the 'Enabled' radio button and set the seconds to zero.
• Click ‘Apply’ → ‘OK’.