Jetico Central Manager Installation
The installation program installs Jetico Central Manager Server. Before running the installation program, ensure the
target computer meets the prerequisites for running the Jetico Central Manager Server previously outlined in the
Jetico Central Manager Prerequisites section of this document.
The Jetico Central Manager Server Setup program follows standard Windows installation protocols and thus provides all necessary explanations throughout the installation process.
All dialog windows of the Setup program have the following buttons:
Cancel - click this button to abort installation
Next - click this button to proceed with the installation
Back - click this button to return to the previous step
The Setup program consists of the following steps:
- Initially, the Setup will check if Java is installed on the computer. If it cannot find Java, or the version is too old, it will display the following message:
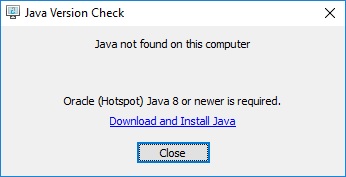
After verifying that the correct version of Java has been installed, the Setup will continue.
- Welcome.
- Read EULA and confirm.
- Select the Destination Directory.
- Choose the name of the Program Folder as it will appear in the Start menu.
- Select license.
(The local files will be copied during this step)
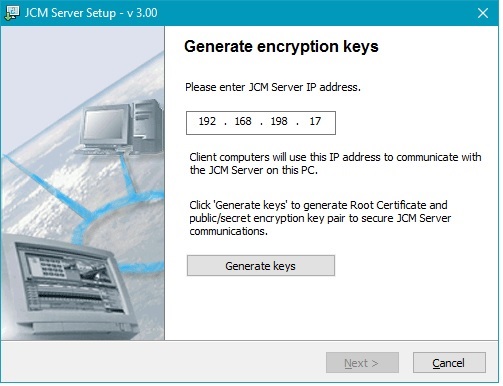
- Set the JCM Server IP address and generate a root certificate and encryption keys:
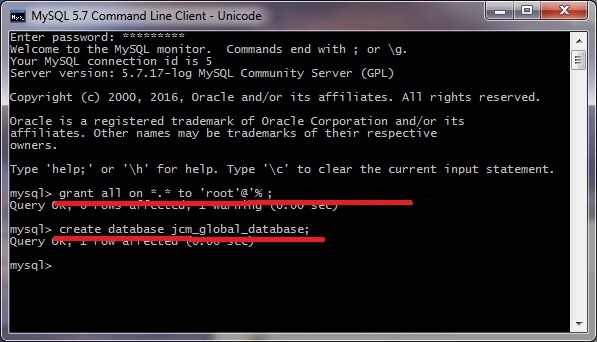
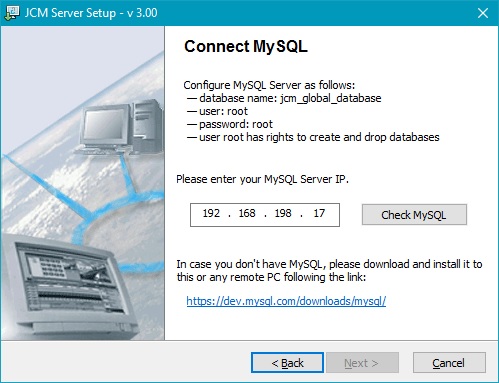
- JCM Server uses MySQL database. In MySQL database, a new database should be created, named jcm_global_database. Also, a MySQL user should exist with
the name 'root', password 'root', and with administrator privileges.
- If MySQL was already installed, open MySQL console and run these two commands:
for MySQL v5:mysql>grant all on *.* to 'root'@'%';
for MySQL v8: mysql>CREATE USER 'root'@'%' IDENTIFIED BY 'root';
mysql> GRANT ALL PRIVILEGES ON *.* TO 'root'@'%' WITH GRANT OPTION;
mysql>create database jcm_global_database;
- If you install MySQL right now, you can create the user during installation:
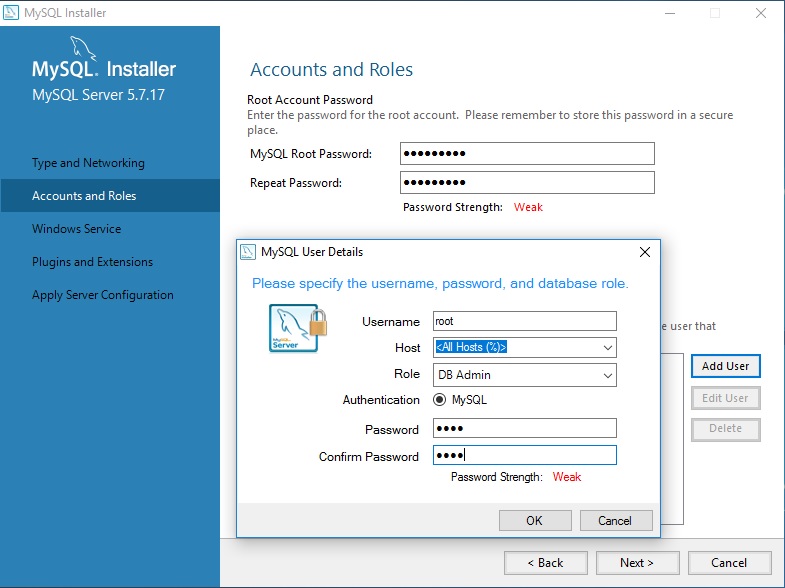
Be sure that the user 'Role' is set to DB_admin and 'Host' is set to All hosts.
After installation is completed, open MySQL console and run the command:
mysql>create database jcm_global_database;
The next Setup window checks for the correct MySQL configuration:
- The cache server Redis is used by JCM for caching. JCM Server Setup will verify Redis has been installed and properly configured:
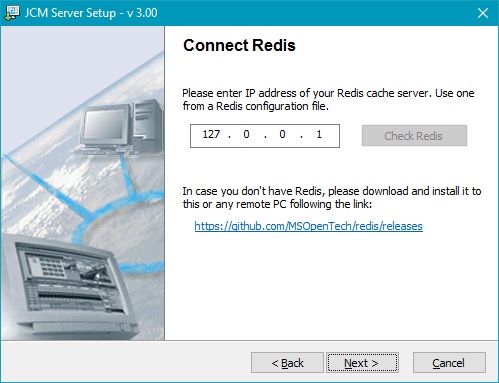
If you did not change the default Redis configuration, leave this field as is - 127.0.0.1. Otherwise, type the IP address that is reported in the file 'redis.windows-service.conf'
in the Redis program folder.
-
Start Server:
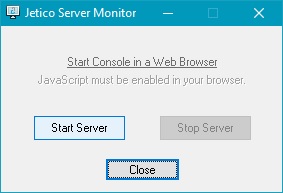
Click Start Server, wait for the hyperlink Start Console in a Web Browser to become active (be patient as this may take some time):
-
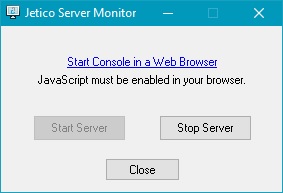
Click the hyperlink to open the Console. Further steps are described in article.
Click Start Console in a Web Browser. If necessary, continue on to the First Login to JCM Console section of this manual for additional instructions.