Wiping commands
BCWipe offers four wiping commands that can be performed within a wiping task.
To enable a wiping command, click on the toggle icon next to it when creating a wiping task. The view will then expand and present a more detailed selection.
🗲HINT: Multiple wiping commands can be selected within the same wiping task
‘Wipe user activity’
Use this wiping command to erase traces of your activity on the PC.
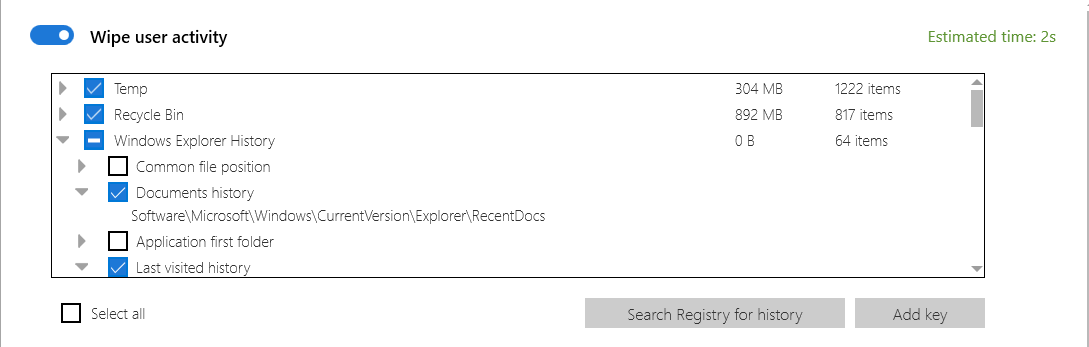
BCWipe automatically lists system and app locations that store traces of your activity on the PC, including the Windows ‘Temp’ folder, ‘Recycle Bin’, ‘Print history’, ‘Search history’, and more.
To wipe an item from the list, tick the corresponding checkbox. For some items, a more detailed selection is accessible by clicking the drop-down menu to the left of the checkbox.
Check ‘Select All’ to include all known system and app locations in the wiping task.
The most commonly used apps, like Microsoft Office components and Adobe products, are included on the list. You can use BCWipe to clean the user activity associated with them.
For other apps, you can use BCWipe to scan the Windows Registry for items like the ‘Most Recently Used’ lists (MRUs) by clicking on ‘Search Registry for History’. Alternatively, you can add it manually by clicking on ‘Add key’ and selecting any keys from the ‘HKEY_CURRENT_USER’ hive. The newly added keys will appear at the end of the list under ‘Custom registry keys’.
‘Wipe browser history’
Use this wiping command to erase traces of your online activity from the PC.
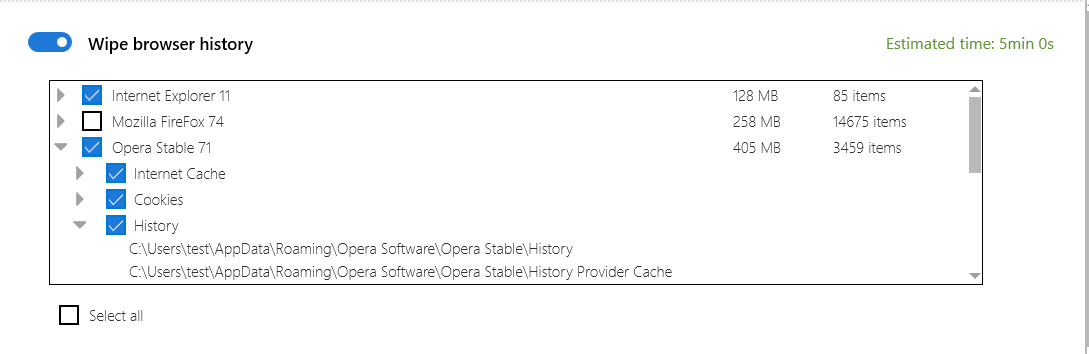
BCWipe automatically detects and list browsers installed on your PC. To clean all data associated with a browser, tick the corresponding checkbox. To only erase certain elements like browsing history or cookies, click on the notch icon next to the checkbox to expand the view and check the required items.
Check ‘Select All’ to include all installed browsers in the wiping task.
‘Delete with wiping’
Use this wiping command to erase selected files and folders beyond recovery.
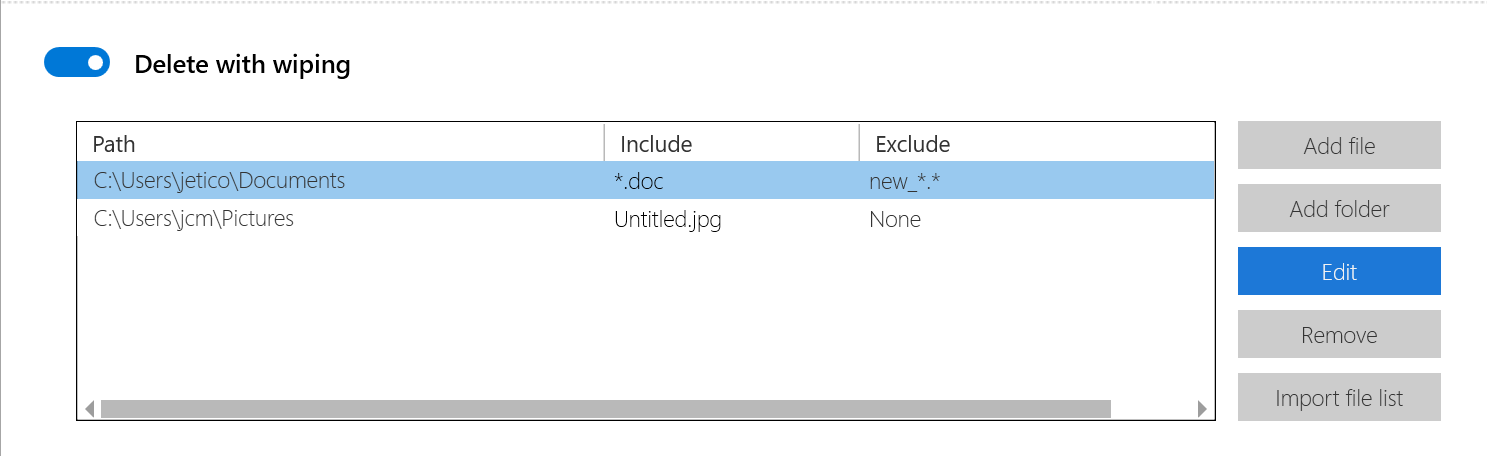
Click ‘Add file’ or ‘Add folder’ to browse for the file or folder that you want to erase.
To wipe all files that fit a certain pattern, or to exclude certain files in the directory from being wiped, select a path from the list and click on ‘Edit’.
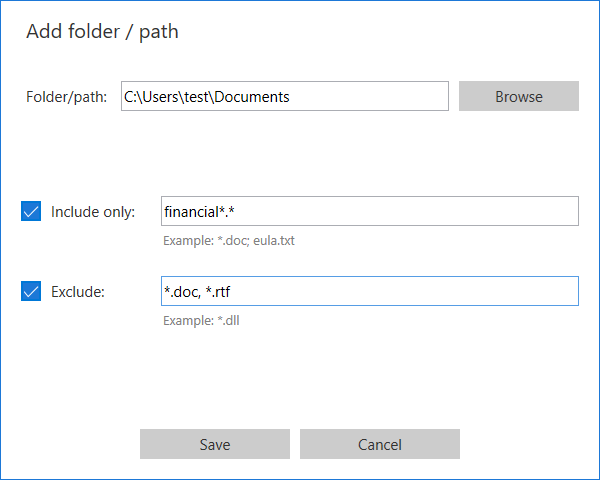
🗲HINT: Use wildcards [*] to specify a pattern. For example, ‘*.txt’ signifies all files with the ‘txt’ extension, and ‘finance*.xls’ stands for all Excel files that start with the word ‘finance’.
In the example above, BCWipe will erase all documents that start with the word ‘financial’, except for ‘doc’ and ‘rtf’ files in the Documents folder.
When you need to erase files in bulk, especially similar files across multiple endpoints as part of a classified data spill remediation, use the 'Import file list'* button. You can create the list manually or use an output from a data discovery software or a search engine. The requirements for the list file are as follows:
- the file must be in a txt format
- one path to a folder or a file per line
- regular expressions can be used to randomize
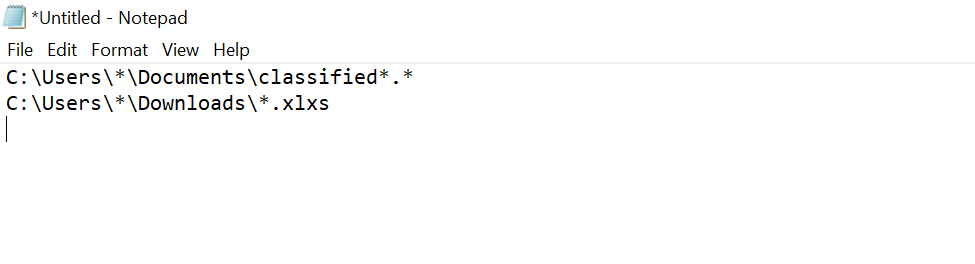
In the example above, a list of folders and files is being created for BCWipe to target. As per this list BCWipe will erase every file that has a name starting with "classified" from the Documents folder as well as all XLXS filed from the Downloads folder. Since the wildcard is used instead of the username in the path, this will be applied to any user profile and hence the list can be reused across multiple endpoints.
* - this functionality is only available with the Enterprise license for BCWipe. Contact us to request a trial.
‘Wipe free space’
Use this wiping command to erase traces of previously deleted files from the hard drive.
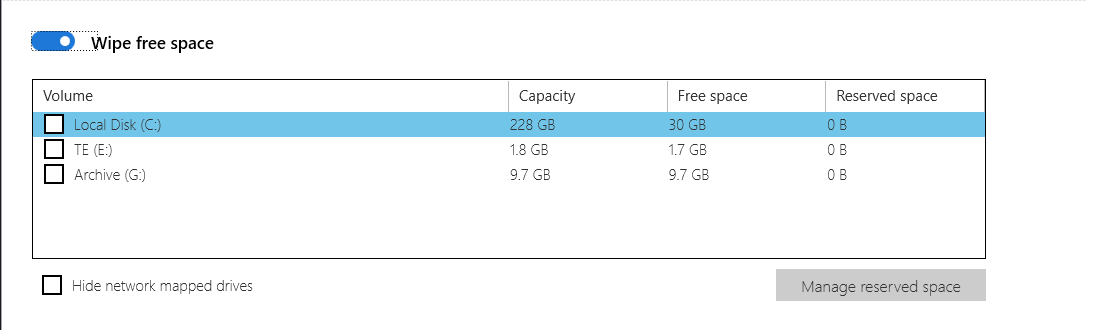
Tick the checkboxes next to the drives that you would like to wipe free space on.
Check ‘Hide network mapped drives’ to only display local drives.
🗲HINT: Save time and resources by preserving part of the free space after wiping with BCWipe’s Reserved Space technology.
Reserved space is drive-specific and should be configured individually for every drive. To enable reserved space for a drive, select the drive from the list and click ‘Manage reserved space’. The Reserved Space Manager window will open. To read more about Reserved Space technology and how to configure it, see this page: Reserved Space