BestCrypt Control Panel
The BestCrypt Control Panel is the central BestCrypt-user interaction application.
It allows you to perform container creation and management (e.g., adding containers, changing and removing passwords) as well as some advanced operations.
The following sections describe all functions of Control Panel grouped together by the task they perform, starting with a general overview of the main Control Panel window.
When you launch BestCrypt, the first thing you will see is the main Control Panel window, consisting of a toolbar at the top of the window and a number of control sections. Let's take a closer look at this window:
Toolbar Items
The Control Panel toolbar provides a customizable set of items to help you access different BestCrypt functions.
Some of these functions apply only to the selected container.
The default set of toolbar items includes Create, Locate, Mount, Eject, Forced eject, Force eject all, and Container guard.
- Create. This function launches a dialog to create, initialize and format a new BestCrypt container file. The Creating a New Container section provides a detailed explanation of this function.
- Locate. This function enables you find an existing container file on your computer. Typically BestCrypt container files have a .jbc extension, but any file can be interpreted as a BestCrypt container if it has a minimum required size. This toolbar item allows you to add any file to the container list and try to use it as a BestCrypt container.
- Mount. This function will mount the currently selected BestCrypt container. This toolbar item is enabled only if the selected container is not already mounted.
- Eject. This function ejects the currently selected BestCrypt container. This toolbar item is enabled only if the selected container is already mounted.
- Forced eject. This function ejects the currently selected BestCrypt container even if some of its files are currently open in an application . This toolbar item simulates physical thumb drive removal and can damage any files currently opened from the mounted container, but it guarantees that container will be ejected in any case. Use it as an emergency measure when you urgently need to eject a mounted container. This toolbar item is enabled only if the selected container is already mounted.
- Force eject all. This toolbar item does the same as Force eject, but for all currently mounted containers with the same possible side effects. Consider this your "panic button" to immediately eject all mounted containers in case of an emergency.
- Container guard. This item allows you to turn on or off the service that protects container files from being accidentally removed, renamed or corrupted. Refer to Container Guard for more information.
Container List
The leftmost area of the Control Panel's main window is called the container list.
Each element in this list corresponds to each container file known to be located on your system.
There are several ways how containers can end up in this list:
- Create new container. All newly created containers are added automatically to container list.
- Browsing for existing containers. Using the Locate button on the toolbar or from the BestCrypt main menu you can locate existing container files and add them to the list.
- Mounting existing containers from Finder. You can mount containers by double-clicking on the container file in Finder. A container file mounted this way will be automatically added to the list if it was not there before.
The container list has an associated context menu for each item, which you can view by right-clicking (or control-clicking) it.
You can use this context menu to easily locate a container file in Finder, remove it from the list, or delete it completely:

Each currently mounted container has a special BestCrypt virtual disk icon next to it so you can easily distinguish between them.
For example, on the screenshot below, a container named secret_data.jbc is currently mounted as indicated by the green icon on the left:

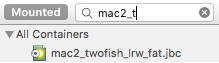
At the top of the list you can also find the list filter bar.
Activating the Mounted filter will only display containers that are currently mounted. The Container Name filter allows you to search the list for containers with names matching the text value you type into the filter input area.
Both filters can be applied at the same time to search for mounted containers with a specified name.
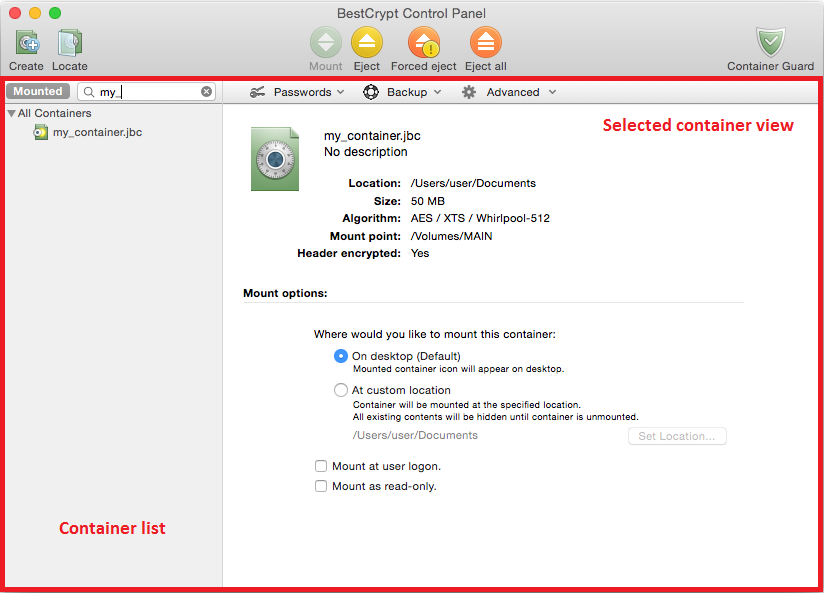
Selected Container View
Upon clicking on any container in the list, that container's information and preferences will be displayed in the rightmost area of the Control Panel window, in this guide referred to as the selected container view. This area displays general information about currently selected container and allows you to change its preferences and perform various operations on it.
The selected container view is divided into three major sections: General information, mount preferences, and the operations bar.
General Information
This selected view section displays basic information about currently selected container:
- File name. Selected container file name;
- Description. Description text issued when container was created. This field is also used to report a couple of special container states. For example, when selected file is missing or is an invalid container file;
- Location. Container file location on your computer;
- Size. Virtual encrypted disk size stored in a container file. Actual container file size is always at least this size and typically a bit more;
- Algorithm. Encryption algorithm employed to encrypt data stored in a container file. This field combines container's cipher, mode names and hash for the password formatted as cipher / mode / hash ;
- Mount point. Shows the location where selected container is currently mounted or "Not mounted" otherwise.
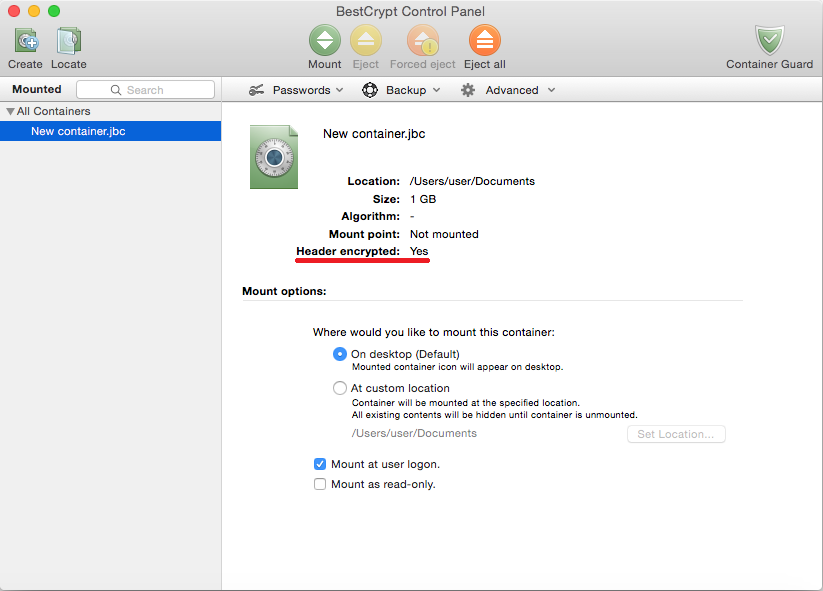
- Header encrypted. If user encrypted the header of the container, or the header is undefined, you may notice 'Yes' as the current status.
Mount Preferences
This section of the selected container view allows you to modify mounting behaviour for this container.
All following options specify default behaviour that can be changed for each particular mount request in container mount dialog.
- Mount location. Specify the default mount location for this container:
- On Desktop. Container will by mounted on the default system path ("/Volumes") and its icon will appear on the desktop. Default option.
- At custom location. Container will be mounted on the location specified by clicking the Set Location button. Any and all existing contents at specified location will be hidden under mounted container. You can use this behaviour to your advantage for example to mount container on the directory where it is located. This way your container file will be hidden beneath container's contents and will not be accessible to anyone until you eject it.
- Mount on user logon. When current user logs on next time automatically ask container password and mount this container.
- Always mount for reading only. When mounted, this container will not allow anyone to perform any changes to it.
Operations Bar
Lastly, the operations bar located toward the top of the window combines groups of operations that can be applied to the selected container into easily accessible menus. Each of these groups of operations is discussed separately in the following sections of this guide, but for now let us briefly describe each group and provide references for more information:
- Passwords. This menu groups together operations that manage container passwords and allow you to add new passwords and change or remove existing ones. Refer to the Managing Container Passwords section below for further discussion.
- Backup. Operations in this menu deal with container key data backups. The Backing Up Key Data section below explains these operations in further detail.
- Advanced. This menu combines advanced container operations that require more information on some of the encryption concepts in order to be used correctly and effectively. Refer to the Advanced Container Operations section below for detailed explanation.
1. Click "Create" on the welcome screen or toolbar.
To create a new BestCrypt container, click the Create button on the welcome screen or on the toolbar.
The following dialog box will appear to guide you through the process:
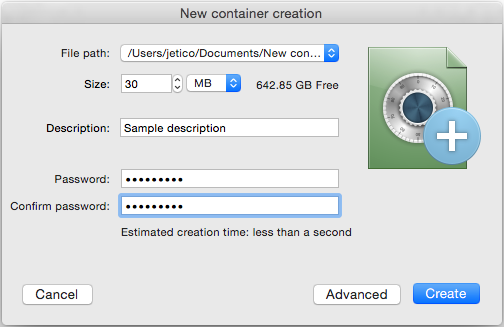
3. Click "Create."
After you have set all preferred properties of your new container, click the Create button.
Choose a location and a name for your new container file in popup sheet dialog and provide an initial password for it.
BestCrypt initializes an encrypted volume inside the new container with random data.
This is needed to ensure the best level of protection of your encrypted data but it can take some time to complete which you can track using the progress indicator displayed above.
You can, however, cancel this operation at any time by clicking the Cancel button.
After the process completes, your new container is ready and will be added to the container list with its properties displayed in selected container view.
If you have specified to mount your new container by activating the Mount new container checkbox, then it will also be mounted at this point.
Although created with only one initial password, each container can have many more assigned to it.
A total number of additional passwords depends on container file format version and password type, but for the default setting it is limited to 64 entries total (including any hidden part passwords).
BestCrypt allows you to add, change and remove passwords for existing containers and hidden parts.
You can access these functions from the Passwords menu in the selected container view operations bar:
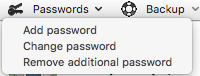
- Add password. This operation allows you to add a new password for your container. It will first ask for any existing password, and based on what is entered it will either add another main part or hidden part password. Hidden part or not, still only unique passwords are allowed.
- Change password. This operation allows you to change any existing container password. The new password value should be unique.
- Remove additional password. This operation allows you to remove an existing container password completely so that nobody can access the container with that password anymore, except for the last main part password.
There is a pattern for how password management works for different volume types (main or hidden).
All password management operations will first ask you to enter an existing container password.
If that password pertains to the main part, then, for example, a newly added password will be added for the main part, and the other way around for each possible hidden part.
For any new password, BestCrypt accepts any printable symbol in any language.
Anything you can type on your keyboard is a valid password symbol.
However, due to security considerations, the minimum password length is always at least 8 characters.
The maximum size is limited to 511 characters.
All container passwords must be unique.
This includes passwords for the main part and all possible hidden parts.
For example, if you are adding a new password for your hidden part but the same password is already used for the main part, then this new password is considered a duplicate and will be rejected.
BestCrypt generates and securely stores a set of encryption keys that all data in the container file is encrypted with. Each correct container password is used to decode those keys and set up a virtual encrypted disk. All data needed to check each password and decode encryption keys is stored in a special section of the container file that you can back up and safely store in a separate file without copying the entire container file with all its encrypted data inside.
BestCrypt allows you to create these key data backup files with the .kbb extension by default, restore previous container states from them and use them to mount your container.
You can use these functions just as you would use most other Control Panel functions: from the Backup menu in selected container view:
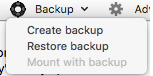
- Create backup. This function safely creates a backup of all container service information, including container header and encoded key data, into a separate file. Any encryption keys or other secret information cannot be read from a backup file without knowing the container password.
- Restore backup. This restores all key data previously backed up in a separate file. Any password changes made to the container after the backup was created will be reverted.
- Mount with backup. This mounts the container using key data backed up in a separate file. Again, any password changes made to container after the backup was made will not be taken into account when mounting from backup.
To use key data backups effectively, there is an important point to understand: backup files contain a copy of all information about container encryption keys and passwords.
This is of course stored in a secure way, but the point is that by creating a backup file you have created a snapshot of all passwords and encryption keys used for this container.
Keep that in mind when you restore key data backup or mount a container using it; in the former case the previous snapshot of all container passwords is restored, and in the latter case you are authenticating against this previous snapshot.
You can use this to your advantage by backing up all container passwords in a separate backup file to safely store it on a remote device and erase or encrypt this very same information in the actual container file.
This way, the only means to mount such a container is by providing a key data backup file stored separately.
BestCrypt provides many advanced functions to keep your data safe.
However, many of these functions require some familiarity with concepts they represent.
They are easy to learn and will provide you with a better level of understanding to perform these operations correctly and effectively and employ them to your maximum advantage.
As always, you can easily find all advanced functionality in the Advanced menu in the selected container view operations bar:
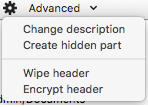
- Create hidden part. This lets you create another encrypted volume in the container file and hide it in the free space of an existing main volume.
- Wipe header. This function completely deletes the header required to mount the container. Note that you will need to provide a .kbb backup file to mount the container afterwards.
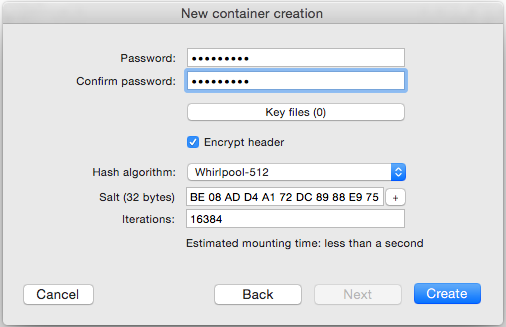
- Encrypt (or decrypt) header. This encrypts or decrypts container header to hide its known format and make it look like absolutely random data.
Most of these operations exist to boost your level of privacy when using BestCrypt containers. The following section describes each one in more detail.
A BestCrypt container file consists of two different types of data:
- Encrypted data that is stored inside a container, and
- A service file header that contains all user-specified information like container description, size and encryption algorithm specification.
Therefore, a BestCrypt container file has a well-known structure that can be easily identified on your computer.
Sometimes it is unacceptable for anyone to know and prove that you have a BestCrypt container file without actually knowing its password or even asking for it. Header encryption exists to avoid exactly this kind of threat.
The header encryption operation encrypts this well-known container header to disguise it as random, nonsensical garbage; the entire container file thus becomes absolutely indistinguishable from noise and does not have any known structure anymore and ceases to have a well-known structure.
Nobody, then, can unambiguously prove that this file is a BestCrypt container.
However, it also means that even BestCrypt itself will not be able to identify this file as a container. When you encrypt container header and select it in container list BestCrypt will not be able to display any information about it. Take a look at the example below. Here we have selected a container with an encrypted header:
To further reinforce your privacy, Control Panel also treats these containers differently to remove any traces of their usage. For example, when you add this container using the Browse button, it will be removed from the container list when you close the Control Panel, thus hiding the fact that you even tried to use this file (which, in any case, is filled with seemingly random data) as a BestCrypt container.
To decrypt a container header and make it visible to BestCrypt again, return to the menu and select Decrypt header.
Hidden Parts
All encrypted data stored inside a container looks like random garbage until the correct encryption key is provided to properly interpret it. BestCrypt takes care of all of this for you; all its asks you to do is supply a password. However, there can be more than one correct interpretation of this encrypted noise, provided you know beforehand where to look for it and have the correct encryption key. And that is the best part: When all your data looks like random garbage, nobody can prove that you have more than one interpretation of it in another subset of data hidden among this random noise.
This is precisely what the hidden part is: A secret subset of encrypted data hidden inside existing encrypted (or random) data that can be made sense of only if you know where to look and have the correct password. Nobody else can prove that it really exists and force you to submit any passwords for it.
In cryptography, this concept is called plausible deniability or deniable encryption and is best explained by an example:
Imagine a situation when you are pressed hard to reveal your container password. If you store all of your very important data inside a hidden part and fill the main part with seemingly and convincingly important (but really just decoy) data you can, after some hesitation, reveal the password for the main decoy part of your container and convincingly deny the existence of any other encrypted data besides the one that you've just revealed to your interrogators. And BestCrypt, of course, makes sure that it is impossible to prove you have anything else besides the main decoy part.
Being a powerful feature, Hidden Parts requires some caution to use properly.
Because BestCrypt does not know about any hidden parts you might have when mounting the main part of your container, any changes you make to the mounted main part can overwrite and damage the hidden part. You are strongly advised to fill your main part with all decoy data before creating any hidden parts.
When you choose to create a new hidden part you will be greeted by the New Hidden Part dialog, shown below:
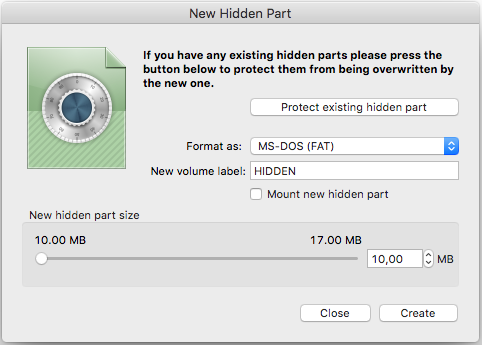
- Format as. As in the Create New Container dialog, this pop-up menu allows you to choose the file system your new hidden part will be formatted in. The default value is the "Mac OS Extended" file system. If you want the container to be supported on Windows and Linux computers, choose "MS-DOS (FAT)" option.
- Mount new hidden part. Activate this option if you want your new hidden part to be mounted automatically after creation.
- New hidden part size. This group of controls allows you to specify the size of your new hidden part much like you specified the size of the container in the Create New Container dialog. The only difference is that the size of the new hidden part is limited by the available free space inside your container's main part.
- Size slider. The slider's maximum value is set to the maximum available size for new hidden part in megabytes. Moving the slider, you can adjust the size of the new hidden part relative to maximum size.
- Size field. This field shows the current exact value of the new hidden part size in megabytes. You can directly input your own values in it and new relative to maximum size will be updated with the Size slider.
- Size stepper. This stepper increases or decreases the new hidden part size by 1 megabyte.
- Protect existing hidden part. If you already have any existing hidden parts in this container, this button will allow you to enter their passwords and take the space they occupy into account when creating another hidden part. Maximum available space will be corrected and BestCrypt will make sure a new hidden part will not use the space occupied by existing hidden parts.
Click the Create button to add and format new hidden part once you've set all preferences and protected any and all existing hidden parts.
You will be asked to supply an initial password for your new hidden part.
After creation completes you can work with your new hidden part as usual. All container operations described in this guide apply to the hidden parts in the same way they apply to the main part, with a couple of exceptions:
- You cannot create a new hidden part inside an existing hidden part, although you can have multiple hidden parts within a common main part.
- Any hidden part information, like size and users, are never shown in the selected container view.
See also:
Basic Concepts
Strong Password Guidelines