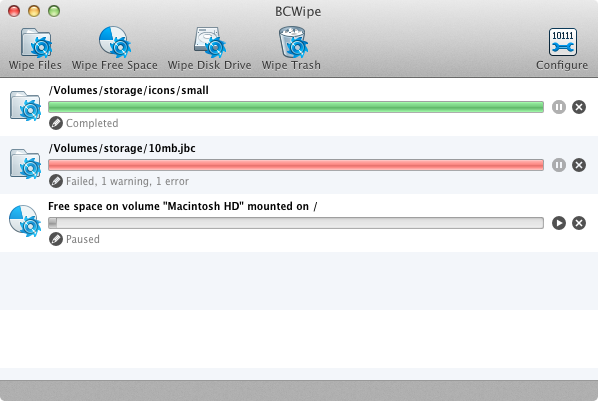
BCWipe Task Manager is a central BCWipe application to manage wiping tasks and options. With task manager you can control all current wiping tasks, collect logging information, create new wiping tasks and configure wiping options. Task manager window is displayed on the screen shot below:
Most of the task manager's window real estate is dedicated to the list of currently running or completed wiping tasks. A wiping task is a single wiping command, configured with wiping options and a target to wipe. Possible targets include files and directories, whole disk drives and a free space on a single disk drive. Each task has an entry in the list shown above that provides feedback about current task status as well as some buttons and menus to control a running task.
On the above screen shot you can see three wiping tasks: one completed with an error, one completed successfully and the last one at the bottom is still running. Lets take a closer look at the single task entry:

This is an entry for a running free space wiping task. From left to right you can see:
You can create a new wiping task in a number of ways but for now let us describe each task type in general where we will show all the ways to create it:
Delete with wiping is used to completely overwrite a group of files and/or folders and, optionally, their names and slacks and delete them without any possibility of restoring them later. Special care will be taken to also remove any alternative data forks and extended attributes of the file. You can delete a group of files with wiping by clicking the Wipe Files button on the Task Manager toolbar and selecting files and/or folder you wish to wipe. You can also just control-click on a group of files you want to wipe in Finder and select BCWipe: Delete with wiping item from the Finder's service menu or just by dropping those files into BCWipe dock icon.
The following options affect delete with wiping task:
When you delete files from disk without wiping their data remains on the disk untouched. Your computer only marks the place where file's data was as free space so that new files can take this space as their own and overwrite it. Delete with wiping allows you to securely erase the file before deletion so that its data will be completely removed from the disk. But when you have just installed BCWipe or connected a new disk to your computer all the files that were deleted without wiping before can be possibly found on this disk's free space. Wipe free space completely overwrites all available free space on your disk to remove all traces of the files that were deleted before without wiping.
It is important to wipe free space on your disks even after you install BCWipe. Your system will typically create a lot of temporary files that you don't even have control over so you can't delete those files with wiping. Those files may very well include temporary copies of the important documents that you've edited before. Since those temporary files were not deleted with wiping their data is left on the disk free space as we have described before. Wipe your free space regularly to avoid leaking important data this way.
As we've described in Delete with wiping existing files on your disk often have a little space that is not used by the file but still is not available for new files - file slack. The slacks of all files on your system can also count as a free space. Use Wipe file slacks option in the BCWipe wiping preferences to always wipe all slacks of all files on the chosen drive before wiping actual free space.
You can wipe free space on a disk either by clicking Wipe Free Space button on the toolbar and selecting the disk or by control-clicking on the disk icon on your Desktop and selecting BCWipe: Wipe free space item in the Finder's service menu. When using the Task Manager button the disk browser panel will drop down to let you choose a correct disk:
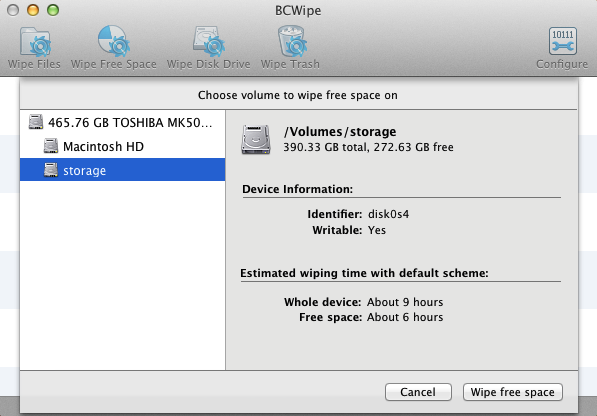
Choose a mounted writable disk and click Wipe free space button. Disk browser dialog will also help you estimate the time it will take to wipe free space on chosen disk with the currently selected wiping scheme. Take a look at the lower portion of the information panel for the chosen disk to find time estimates for wiping whole disk and free space on it. Please take note however that it is impossible to estimate the time it will take to wipe slacks of all files on this disk so that time is not included with the estimate.
Sometimes even wiping all files and free space on a disk is not enough to clean every possible leak. Such situation may include disks that previously contained another file system and then were reformatted. Wipe whole disk task will erase a whole disk or partition completely, including all file system structures, files and free space. Every byte on a disk will be overwritten. After this the disk will not be mountable until you reformat it again to create a new file system in place of the destroyed one.
Use this task when you need to get rid of one of your external drives or internal hard disks to ensure that its new possible owner will never be able to extract even a single byte of your information.
You can wipe a whole disk either by clicking Wipe Whole Disk button on the Task Manager toolbar and selecting the disk or by control-clicking on the disk icon on your Desktop and selecting BCWipe: Wipe whole disk item in the Finder's service menu. When using the Task Manager button the disk browser panel will drop down to let you choose a correct disk:

Choose any writable volume or disk and click the Wipe media button to wipe it. The volume or all volumes on a disk you have selected should be unmounted before BCWipe can wipe them. To do that BCWipe will ask you to close all applications and files opened from this volume or any volumes on a disk and unmount it. After that wiping will start and overwrite everything on the disk including all filesystem structures. If you want to use this disk again first format and mount it using Apple's Disk Utility.
This command allows you to conviniently delete all files and folders moved to Trash but not yet deleted. Essentially this is the same as Delete with wiping but with a shortcut to locate all files currently in Trash and dispose of them securely.
BCWipe Log Viewer is a special utility built into BCWipe to view detailed information about completed and still running wiping tasks. You can view the log of any task that is currently displayed in BCWipe Task Manager by clicking the View Task Log button located on the view of the task in question. BCWipe will present you with this dialog window shown below:
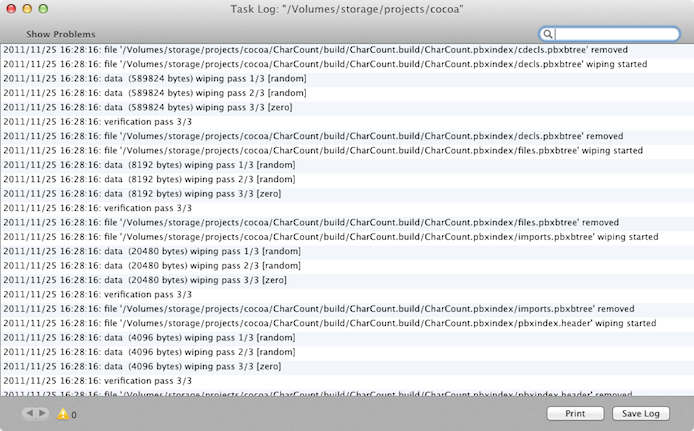
As you can see most of the window space is devoted to actual logging information of the task. You can save the log to a separate text file using the Save Log button, send the whole log immediately for printing by clicking the Print button and quickly filter the information using the Keyword filter field located in the upper-right corner of the window.
If BCWipe reported any errors or warnings that occurred during wiping process you can turn the Show problems on and BCWIpe will only display information about any warnings or errors. Turn it off to view everything again.
The total number of current problems is also displayed in the lower-left corner of the window along with Go to previous/next problem buttons. Use them to quickly scroll the log and focus on the important warning or error message.